NBIS Support Checklist Guide
The purpose of NBIS Support Checklist is to be a tool that helps to go through the main points of data management strategies for the support project, as well as provide the NBIS Data Steward with sufficient information to be able to assist with data management issues in general and specifically with data publication.
The Checklist is divided into two parts, Bioinformatician checklist and Data Steward checklist, to be walked-through at separate occasions:
- Bioinformatician checklist - At the time of the first meeting between NBIS Bioinformatician and the Research group, before the project is initiated.
- Data Steward checklist - At a start-up data management meeting, between the Research group, NBIS Data Steward and Bioinformatician, when the project starts.
The expected process is that the Checklist is created by the assigned Data Steward, when the project has a signed contract or hours ordered is set in the NBIS project management system (Redmine). The Bioinformatician is making sure that the questions in the first part are answered during a meeting with the Researcher. The Bioinformatician tells the Data Steward when this first part is completed, upon which the Data Steward will go through the answers and determine if assistance is needed. In such cases, a data management meeting will be arranged, during which the second part of the questions in the Checklist will be addressed.
Note: This guide is NOT for creating a data management plan, for that purpose please go to the DMP guide instead.
Contents
- Get started
- Orientation
- Fill the checklist
- Add a TODO
- Add a comment
- Create a document file
- Outdated project
- Create a copy
- Get help
Get started
- Click on
Projectsin the left-hand margin

- Click on
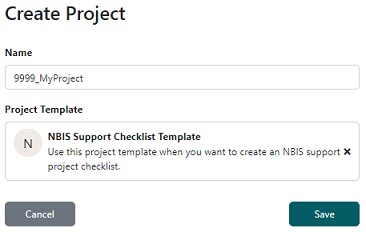
Createin top right corner, name the project <Redmine number>_<short project name>, select the project template namedNBIS Support Checklist Templateand click onSave.
Orientation
-
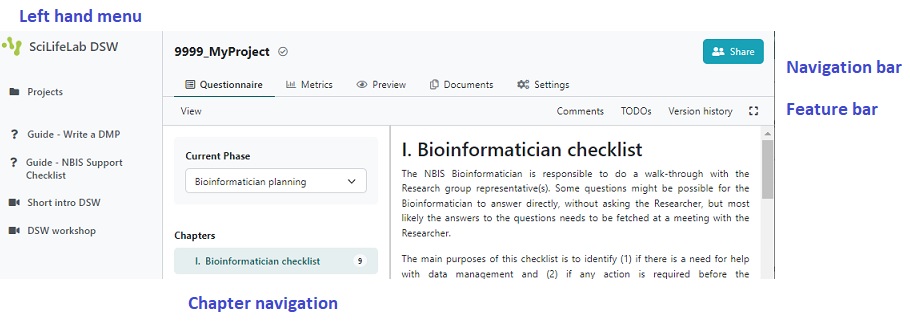
The menu on the left-hand margin is the top level menu of the tool, with Guide links and where you can find all your projects
-
In the top of the page, there is a navigation bar with tabs that allows you to shift between different views of the current project
Questionnaireis where you answer the questionsMetricsshow statistics of questions answered (not applicable)Previewdisplay the output documentDocumentsis where you create and download output documentSettingsis where e.g. name and default document format can be changed.
-
Directly under the navigation bar is a feature bar with:
Viewshow or hide tags, phases, and/or authors under questionsCommentsshow or hide commentsTODOsshow questions in need for actionsVersion historybrowse historyZen modeshow or hide left menu and navigation bar
Note: This guide will only go through the Comments and TODO functionalities, for a guide on the other features please see Useful tips and tricks
-
Next to the left-hand menu, there is a Chapter navigation overview, where you can change phases (use
Bioinformatician planningfor Bioinformatician checklist questions andData Steward planningfor Data Steward checklist questions), see the chapters and how many questions need to be answered. This number will be reduced while answering, and when all questions are answered a tick will appear instead (see for example the chapter ‘Data Steward checklist’ which is ticked already for this phase).
Fill the checklist
The DSW provides a filtering feature that allows you to see questions relevant only to a particular phase of a research project. When answering questions in Bioinformatician checklist, the default ‘Bioinformatician planning’ is to be used.
- The answers will be saved automatically.
- Under most of the questions you will find guidance or advice on how to answer or what to consider.
- For some questions you may provide more than one answer. If you want to add a new answer click the
Addbutton at the end of your last answer. Note: When doing so, you might need to scroll up in order to get to the first field to be filled.
Add a TODO
The tool has a TODO function, which lets you mark questions where an action is necessary. This is useful (and encouraged) e.g. if you need to collect an answer from a collaborator, or if you want to think about the answer for a while and get back to it later.
Example
- Click on
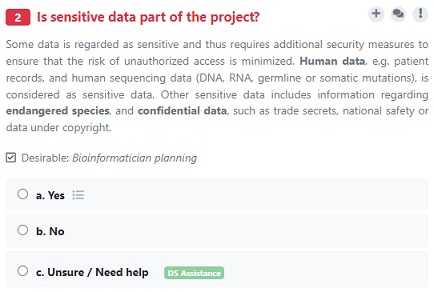
Bioinformatician checklistin the Chapters overview menu and scroll down to the question2. Is sensitive data part of the project?
- Hover on the
+sign next to this question, and then click on the appearing+ Add TODO. - Notice that you now have 1 TODOs in the features bar at the top of the page. If you click on it you will see a list with the question(s) which need an action. The list is linked, so clicking on an item in the list will lead you directly to it.

- To remove a TODO, just click on the yellow
TODO X.
Add a comment
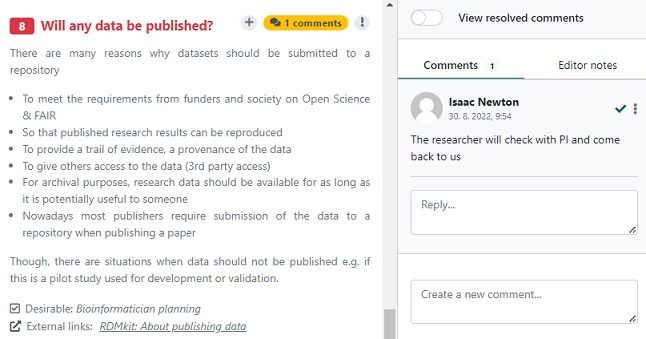
It is possible to add comments by clicking on the bubble icon next to a question, adding a comment and then click on the Comment button.

As in other tools, where adding comments are possible, one can reply, mark as solved, or delete.
Create a document file
When the questions are answered you can create a document with your answers, and download it to your computer.
Example
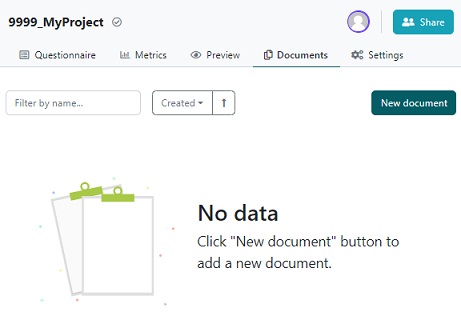
- Click on
Documentsin the navigation bar at the top of the page. - Click on the
New documentbutton.
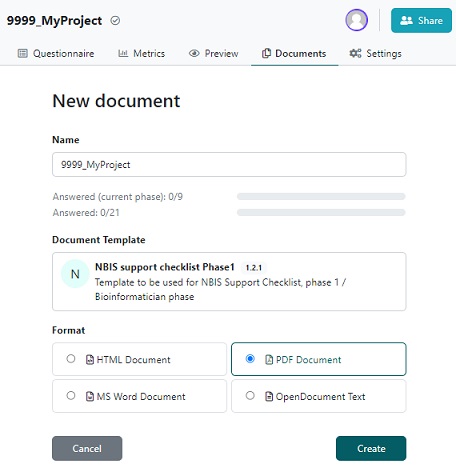
- By default the document template is
Support checklist Phase 1, which will output the Bioinformatician checklist. There are two other document templates available, one which will output Data Steward checklist questions and answers, and one that will output both checklists. Click on the template if you wish to change into one of the other templates. - The default document format is
PDF Document, but you can select any of the other formats as well. - Click
Create.
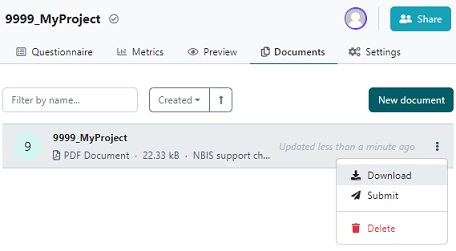
- To inspect the resulting document, click on the three vertical dots to the left of the document and select
Downloadin the appearing menu.
Outdated project
When we update a template, you will get an update available tag next to the name of your project, to make you aware that you are not working with the latest version of the template.
You don’t have to do anything, but hopefully the updates have an improved value, with new questions or better guidance. In order to make the project up-to-date, you can use the Create Migration function.
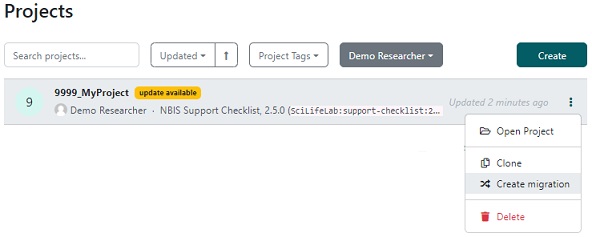
First step
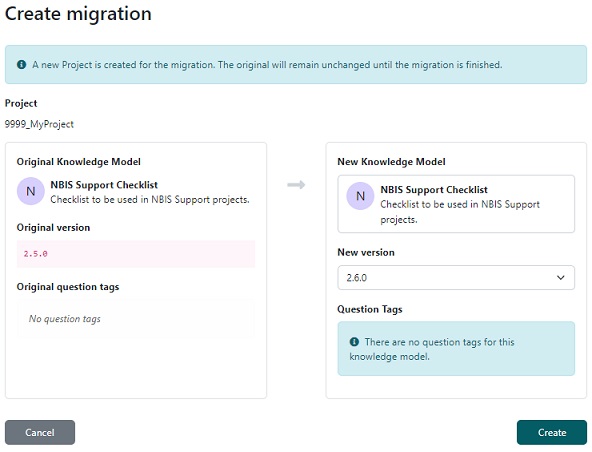
In the first dialogue window, select the highest version number as New Version and click on Create.
Note: The outdated version will remain unchanged until you specifically delete it, these steps will create an updated copy. Unless you really do want to keep the outdated version, we recommend that the outdated version is deleted after the migration is finalized. If you do keep the outdated version, we recommend that you deactivate the Share >> Public link in order to prevent that a collaborator continues to work in the outdated version instead of in the new one.
Second step
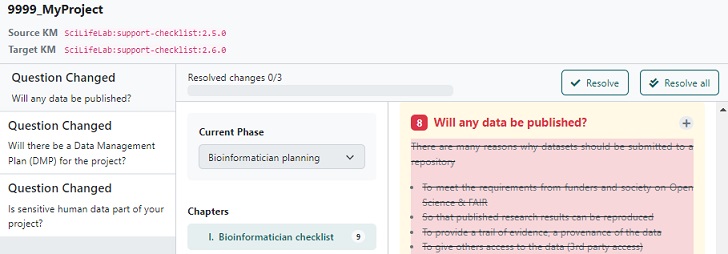
A window with the differences between the versions appear. The left panel displays an overview with the type of difference for each question, whether it is a new or a changed one.
In the right panel the detailed difference is displayed. Highlighted in yellow is the current change you need to approve of by clicking on Resolve (or Resolve all if you don’t want to check and approve everything that has changed) in the top right corner.
Third step
When all changes have been resolved, an option to Finalize Migration will become visible in the top right corner, click on it to finish the update. This will open the updated project, so that you can see if there are new questions to be answered.

Create a copy
If you want to have different versions of the checklist, e.g. one version when applying for support, one version during the project, and one version at the end of the project, this is possible using the Clone function:
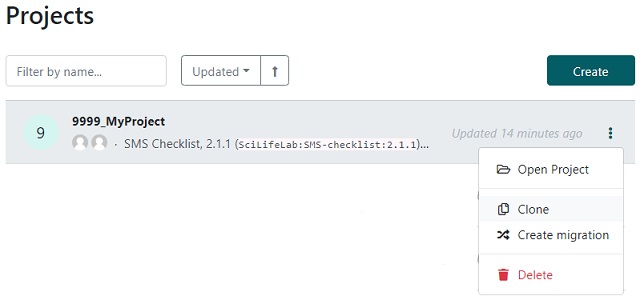
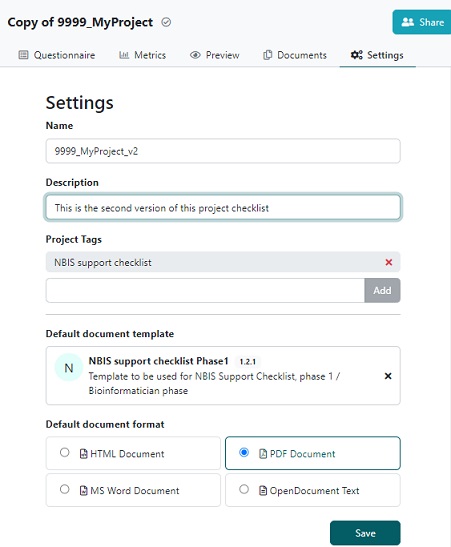
The clone will get the prefix ‘Copy of ’ as name (e.g. ‘Copy of 999_MyProject’). To change the name, click on it to open it, then click on Settings in the navigation bar at the top. Change the name (and possibly other settings, like adding a description) and click on Save.
Get help
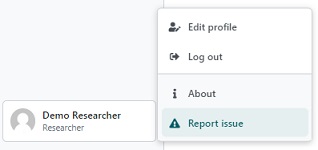
If something is not working correctly with the tool, please click on your login name in the left-hand menu (at the bottom), then on Report issue.
If you want to give feedback on a specific question (e.g. more/better guidance, fix typo), click on the ! sign at that question.

If you need help answering a question, you are most welcome to send an email either to the data steward assigned to your project or to data@nbis.se